Showing posts with label indian snack. Show all posts

Monday, January 12, 2015

Murukku


There are some things that taste good , only when its homemade. Murukku is one such snack.
I haven't tasted any store bought ones that tastes as good as my mother's or my grandmother's homemade ones.
For those who don't know what murukku is, its a crunchy yummy south Indian snack made of rice flour and urad dal flour (black gram) and some spices.
Usually in Hindu families these are  made as special treats for celebrations like diwali. In our house, my mom used to make it every now and then, like during school vacation time, or when someone goes back to college after holidays or whenever she had a few days off.
Its a bit time consuming process, making the dough to the right consistency and pressing it using the preser, but the end results absolutely worth it. Once you start making them home, i promise you won't go back to the store bought ones.

Murukku

Nikki

Recipe adapted from here

Ingredients

  • Rice flour: 1 cup
  • Urad dal flour (black gram): 1/4 cup
  • Asafoetida: 1/8 tsp
  • Cumin seed: 1 tsp
  • Butter: 1 tbsp
  • Warm water: as required
  • Salt: as per taste
  • Chili powder: 1/4 tsp (optional)
  • Oil: enough for deep frying

Instructions

To make urad dal flour 

  1. Heat a pan on medium flame and dry roast urad dal, until it turns light brown in color and you get a nice aroma.
  2. Let it cool, and grind it to a fine powder. Sieve to separate the grains and grind the grains again to a fine powder.

To make rice flour

  1. Soak rice in water for 2 hrs. Wash and drain the rice and spread it on a clean kitchen towel.
  2. Once it gets partially dry, grind the rice to a fine powder.
  3. Sieve the powdered flour to separate any big grains, and grind the grains again to a fine powder.
  4. Heat a pan on medium flame and dry roast the rice flour until you get the nice roasted aroma.

How to make murukku

  1. In a mixing bowl, mix together the rice flour, urad dal flour, hing, cumin seeds, salt and butter.
  2. Add warm water to this mixture little by little, kneading with your hand until we get a smooth non sticky dough like the roti dough.
  3. Prepare the murukku presser with the star shaped template. Take a some dough and shape it like a cylinder by hand and fill in the presser.
  4. Take a parchment sheet and press the murukku on the sheet in small spiral shapes.
  5. Heat enough oil in a pan for deep frying. When oil gets really hot, drop 3-4 murukkus at a time and fry till it turns light brown on both sides.
  6. Drain on a paper towel and let them cool.
  7. Store in an air tight container, stays fresh for 2 - 3 weeks.
Notes:
  • There is more info about the murukku press in my Pakkavada recipe post. Can be easily found in any Indian store.
  • I used store bought rice flour. My mother makes big batches of homemade flour which enhances the taste. But good quality store bought rice flour and does a pretty good job.
  • If you have a flat slotted spoon, use that to get the spiral shaped dough off the parchment paper and to slide it into the oil for frying. This avoids the pressed dough from breaking apart.
  • Its always a good idea to double or triple the recipe to get a good big batch of murukkus. But for first time, always try with the quantities mentioned in the recipe and make sure you get the right crunchiness and taste.

Wednesday, July 24, 2013

Pakkavada/Ribbon pakoda (A savory Kerala snack)


There are a few staple snacks my mom, my grand mom used to make when we were kids.They make them in bulk occasionally and its stored in airtight tin boxes. Me being a savory persons always loved them.
My mom used to make spicy mixture (my cornflake mixture is an easy version of it), pakkavada, kaya varuthathu (raw plantain chips), chakka varuthathu (raw jackfruit chips), masala peanuts, Murukku.....the list goes on and on.
The ones you get in the stores, i mean the bakery shops, small chips shops near bus stand n railway station in Kerala are equally good. They make it in pure coconut oil....yummm ...divine :)
I always make my dad buy a couple of bags of these whenever I travel by bus or train for studies/work.
Life was pretty easy then. Anyway gone are those days...

Recently, while browsing through my mom's recipe collection (of which we all 3 sis have made a copy of), i came across the pakkavada recipe.
Seemed simple, just a few ingredients. And also i had the gadget, the idiyappam press/mold (I got mine from my MIL,she got it from her MIL).

This is how it looks


Here is a link to the modern version of it.
http://www.perfectpeninsula.com/KitchenPress.html
I have seen this in a few Indian stores around. But the old ones are really sturdy and durable.

Here is the recipe.

You'll need:

Besan / Gram flour (Chickpea flour) : 2 1/2 cups
Rice flour : 1 cup
Asafoetida : 1/2 tsp
Red chilli powder :  1 1/2 tsp
Melted butter: 1 1/2 tbsp
Warm water : enough to make the dough (approx 1 1/2 cups)
Salt : to taste
Curry leaves : a few sprigs (for garnish)

How to make:

In a mixing bowl, combine besan, rice flour, chilli powder, asafoetida, salt and melted butter.
Add warm water little by little and knead it into a smooth dough. It might be a little sticky, apply a little bit of oil on to your palms to keep the dough from sticking. But the consistency must be looser than the regular roti dough.
Put the narrow slit disc in the press and fill it with the dough by hand or by a spoon.

Heat oil in a deep frying pan. When it gets sizzling hot, pipe the dough into the oil slowly and carefully in a circular motion. Fry until it gets golden brown in color, and drain them on to a paper towel.
Do it in batches. Once done, turn off the heat and immediately add a few springs of curry leaves to the oil.
Be careful, it will splutter !!
Fry just for a few secs, drain and mix with the pakkavada.
Enjoy the anytime yummy snack :)

Sunday, June 30, 2013

Peanut Chikki/ Peanut Brittle (Kadalai Mittai)


I like to call it kadalai mittai...no, kappalandi mittai to be very precise....thats what we call it in our place :)
an all time fav of all desis (Indians)....we always had a bag of this in our snack shelf..
I have not seen my mom make this at home...dont know why, may be because we used to get it in every other grocery store in my hometown, even in the tiny petti kadas (small convenient stores near the houses)


After coming to the US, we always had to depend on the Indian grocery store to get some chikki...but sadly, most of the time we had to compromise with stale or kind of cold, not crisp, not so fresh chikki....
and that made me look for the recipe for chikki in the web....and surprisingly got to know its not that very difficult to make some home....but let me warn you first, you have to try it a couple of times to master the right consistency and the timing factor...i have had my share of flop attempts too :)
but once you get the grip on it,  its a piece of cake.


You can either use roasted unsalted peanuts or get raw peanuts and roast them in the microwave.
I always buy raw peanuts in bulk and roast them in microwave.It hardly takes 4-5 mins...

Here is the recipe

You'll need:

Peanuts: 1 cup (roasted & unsalted or raw peanuts roasted in microwave)
Sugar: 3/4 cup
Ghee: 1/4 tbsp
Baking Soda: a pinch

How to make:

Spread the raw peanuts evenly in a single layer in a microwave safe plate. Microwave it for 2 min on high.
Let stand for a couple of min, take it out of the microwave, give it a stir and put it back in the microwave for another one min.
Repeat the process until the peanuts are roasted. Usually it gets done in 4-5 min. It might still look raw when you take them out of the microwave. When it cools down, it will have the perfect crunch...
Make sure you don't burn them...
Not in a mood to do this, always go for store bought roasted ones :)

Heat a pan and coat it with ghee and add the sugar. Sugar will start melting and change into amber color.
The consistency of the sugar syrup is the key. And also mixing it with the nuts and spreading it fast.
Once the sugar starts changing color, immediately pour a drop of it into a bowl of cold water. If it crystallize, then its the right texture.
As soon as the color starts to change, take it off the stove, add a pinch of baking soda and immediately add the roasted nuts and mix well.
Pour this gooey mixture into a greased pan and flatten it use a rolling pin.
Or use the greased bottom of an another smaller pan, to press down the mixture.
Once cooled, break down into desired sized pieces.
Store in an airtight container.

P.S: It might take a couple of attempts to get the right consistency of the sugar syrup....so I would suggest always try with a smaller quantity first. But I promise you'll get there :)
Also you can use other nuts like cashews, almonds, pistachio etc along with the peanuts to make it a healthy energy bar :)


Monday, June 11, 2012

Parippu Vada (Lentil/Dal Fritters)


It has been raining lately in TX....such a great relief in the midst of scorching summer...i guess I can't stop complaining about the bad weather here at our place...its getting worse day by day..while a major chunk of summer is stilling waiting out there for us...
any ways, no point in complaining...so lets enjoy the blissful rainy days we get as a surprise and enjoy these li'l treats :)


Parippu vada is my all time favorite snack...I would rather say, the to go snack...my dad gets this for me almost every other day if I am home...its like this...parippu vada for me, pazham pori for my li'l sis :)

you get the first glimpse of  yummy snack like this in a polythene cover...


open it, you find the yumm vadas...actually instead of the parchment paper, you have the greasy plantain leaf...


there you go....attack :)

You'll need:


Chana Dal (Split Bengal gram) : 2 cups
Green chillies: 2-3 nos, finely chopped
Onion: 1 no, medium sized, thinly diced
Ginger: 1-2 tsp ( I grate a small piece of ginger into the batter)
Curry leaves: a few sprigs
Asafoetida: a pinch
Salt: as per taste
Oil: Enough for deep frying

How to make:


Soak dal in water for 2-3 hrs. Drain the water completely. Grind the dal in the mixer coarsely.
Do not make it a fine paste. To this add sliced chillies, onion , ginger, asafetida, curry leaves and enough salt.
Make small balls of these mixture and flatten each in your palm to small rounds.
Heat oil in a pan and deep fry 3-4 of them at a time, cooking for 2-3 min on each side on med-high flame or until the vadas turn golden brown and crispy.
Drain on a paper towel and enjoy with  a hot cup of tea

Thursday, May 3, 2012

Rava ladoo..sweet semolina balls


its time for something sweet...generally i am not a sweet person....i mean literally and also when it comes to food ;) but recently I have a craving for something sweet once in a while... otherwise also i enjoy a small piece of dessert(be it anything) after my food...but just a small piece..even a candy would do...i guess these days my sweet tooth is popping up every now and then :)
this ladoo is a very simple one...even simpler when I accidently brought home a can of sweetened grated coconut from the Indian store...i usually buy canned coconut milk.this one was sitting next to it in the aisle.


You'll need:


Rava/Semolina: 1 cup
Sugar: 1 cup
Warm Milk: 5-6 tsp
Grated coconut: 1/3 cup
Cashew nuts: 10 nos
Raisins: 10 nos
Cardamom pwdr: a pinch
Ghee: 2 tbsp

Note: If you are using the canned sweetened grated coconut like me, use 1/3 of a can and you can omit the sugar as the coconut is already sweetened.


How to make:


Heat 1 tbsp of ghee in a pan and first roast the cashew nuts and then the raisins.Drain them from oil and set aside.
Add rest of the ghee and roast the rava on low flame till you get a nice aroma.
Mix grated coconut and sugar in a bowl. To this add roasted rava, followed by cashew and raisins.
Mix well and add a pinch of cardamom pwdr. To this mixture, add a few tsps of warm milk, just enough to bind everything together.
Gather small balls of size of a lemon from the mixture, just by rolling it in your palm.
Add a few tsps more of milk if its not firming up good.
Rava ladoo is ready...yumm...


Wednesday, March 14, 2012

Cornflake mixture---an easy munch on Indian snack


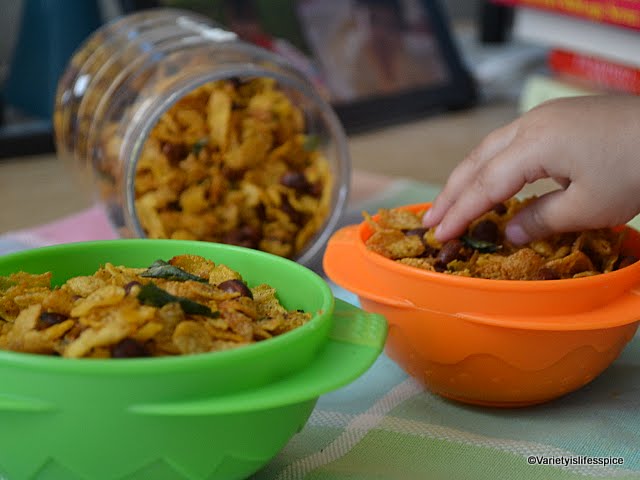
I love crunchy munchy snacks...especially this mixture....its a must buy for every time I hit the Indian grocery store....back home in Kerala, we get this corn flake mixture in 'Honest' bakery...fresh and yummy...i can easily gobble down a packet in a few mins :)
I still remember those days when my dad used to buy these mixture and roasted peanuts very religiously from 'Honest' (well, he buys it now a days too...), I eat it right from the packet and there goes my sweet mother cribbing about the pimples that used to pop up on my face the very next day....thanks to my oily skin....

see this, even my li'l one loves to pick the corn flakes from it...mommy's girl :)


very easy to put together....

You'll need:


Corn flakes: 3 cups
Roasted nuts: 1 cup (mostly shelled peanuts and cashew nuts)
Golden raisins: 1/4 cup
Chili powder: 1 tsp
Turmeric powder" 1/3 tsp
Salt: to taste
Sugar: 1/2 tsp
Lime juice: 1 tsp
Curry leaves: a few sprigs

Note: You can vary it by adding any kind of nuts or dry fruits of your choice...like almonds, pistachios, dried   cranberreis, dried apricot etc...

How to make:


Heat oil in a pan and toss in the raisin and nuts.Add the curry leaves and stir for a min or two.
Reduce the heat to low, and add the chili powder, turmeric powder, salt and sugar.
Carefully mix in the tsp of lime juice, for it will make the oil splatter.
Now slowly fold in the cornflakes in batches and let it stand on low flame for about 3-4 min, until the cornflakes gets coated well with the spice mixture.
Let it cool and store in an airtight container....and start munching :)


Total Pageviews

Powered by Blogger.