Showing posts with label Healthy snack. Show all posts

Wednesday, August 28, 2013

Baked Crispy Kale chips


Okay, let me be very frank...I have never bought  this veggie though I have seen it every time i go the produce section of the super market.
I have told you earlier too, my veggie choices were very limited :)
Of late, I have been seeing these kale chips all over the blogging world...wanna give it a try.
believe me, it tastes heavenly good.
ta dah, one more veggie in my so called "veggie choices".


We have the habit of having something crispy with our lunch. ie; with rice, dal and sabzi. Mostly we have paapad, at times when we don''t have paapad, we opt for plain old lays chips too..but we need something crispy..that is the rule :)
Now a days these kale chips have taken paapad's place.
They are baked, its a veggie, its crispy and above all its yummy.. C'mon, what more you can ask for?
Next time, when you go, get a fresh bunch of this beautiful veggie, and try these chips. you are gonna love it.

Recipe adapted from here


Baked Crispy Kale chips

Ingredients

  • Kale: I bunch (the curly kind)
  • Olive oil: 1 tbsp
  • Salt: 1 tsp

Instructions

  1. Preheat oven to 350 F.
  2. Line a cookie sheet with parchment paper.
  3. Wash the kale leaves thoroughly and dry it well on the kitchen towel. Use a salad spinner, if you have one.
  4. Remove leaves from the thick stem using a knife or kitchen shears and tear them into bite sized pieces.
  5. Drizzle kale leaves with olive oil and sprinkle with salt.
  6. Spread the leaves on the prepared cookie sheet, with the curly side down. Bake for 10-12 min until the kale leaves get crispy in the edges. For even baking, give the leaves a stir, half way through baking. Cool them completely before storing in an airtight container.
Next time you have those hunger pangs, munch on these yummy healthy snacks ;)


Thursday, August 1, 2013

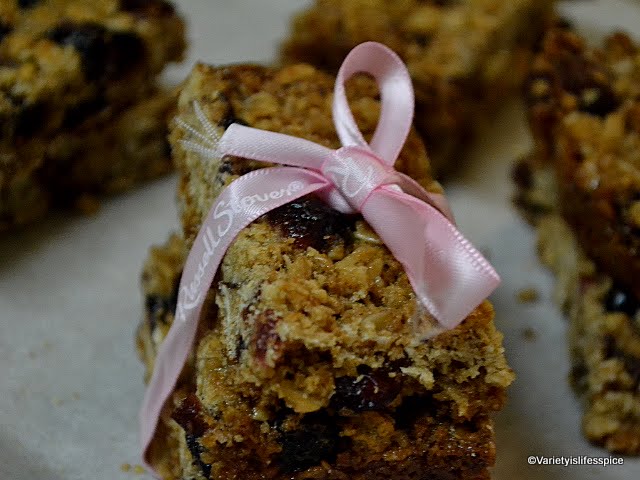
Granola bar


Are you a morning person? I am not. I can stay up late in the night, but getting up early is a no no for me.
If you are like me these granola bars are your life saver. I love having it as a snack, but these energy bars can be perfect grab n go breakfast too...
I have to eat when I am hungry. I mean, I am a hangry person. Hunger pangs makes me angry.
These granola bars have saved me in those situations. Especially on those days when you have a bit of long drive back home after work, or you had a light breakfast and its not lunch time yet.
Even otherwise I like to munch on this crispy bars of delight.

I used to buy them from the grocery stores, until one day I found these yummy granola in a near by farmers market. I bought some and thought, why not try to make some granola bars of it...brilliant idea, huh?

It's not that a big deal to whip these up, if you have the ingredients handy.

Here is the recipe : Adapted from Ina Garten's recipe here

You will need:

Old fashioned oatmeal: 2 cups *
Toasted wheat germ; 1/2 cup
Unsalted butter: 3 tbsp
Light brown sugar: 1/4 cup
Honey: 2/3 cup
Vanilla extract: 1 1/2 tsp
Salt: 1/4 tsp
Almond: 1 cup (sliced)
Dried apricots: 1/2 cup (chopped)
Dried cranberries: 1/2 cup
Raisins: 1/2 cup

* I substituted 1/2 cup of oatmeal with store bought granola.Not necessary.You can follow the original recipe. Also you can mix and match different nuts and dried fruits of your choice.

How to make:

Preheat oven to 350 degree F.
Grease a 9 x 13 inch baking pan and line it with parchment paper.
Toss the oatmeal, almonds together on a sheet pan and bake 10-12 min, stirring occasionally, until lightly browned.
Transfer the mixture to a large mixing bowl and stir in the wheat germ.
Reduce oven temperature to 300 degree F.
Place butter, honey, brown sugar, vanilla extract and salt in a small saucepan and bring to a boil over medium heat. Cook for a couple of min and pour over the toasted oatmeal mixture. Add the dried fruits and stir well.
Pour the mixture into the prepared pan and press it down using a spatula or by hand.
Bake for 25-30 min, until golden brown. Cool for 2-3 hrs and cut into desired shapes.
Store in an airtight container.
Make sure you have a couple of these in your hand bag before you step out :)


Sunday, June 30, 2013

Peanut Chikki/ Peanut Brittle (Kadalai Mittai)


I like to call it kadalai mittai...no, kappalandi mittai to be very precise....thats what we call it in our place :)
an all time fav of all desis (Indians)....we always had a bag of this in our snack shelf..
I have not seen my mom make this at home...dont know why, may be because we used to get it in every other grocery store in my hometown, even in the tiny petti kadas (small convenient stores near the houses)


After coming to the US, we always had to depend on the Indian grocery store to get some chikki...but sadly, most of the time we had to compromise with stale or kind of cold, not crisp, not so fresh chikki....
and that made me look for the recipe for chikki in the web....and surprisingly got to know its not that very difficult to make some home....but let me warn you first, you have to try it a couple of times to master the right consistency and the timing factor...i have had my share of flop attempts too :)
but once you get the grip on it,  its a piece of cake.


You can either use roasted unsalted peanuts or get raw peanuts and roast them in the microwave.
I always buy raw peanuts in bulk and roast them in microwave.It hardly takes 4-5 mins...

Here is the recipe

You'll need:

Peanuts: 1 cup (roasted & unsalted or raw peanuts roasted in microwave)
Sugar: 3/4 cup
Ghee: 1/4 tbsp
Baking Soda: a pinch

How to make:

Spread the raw peanuts evenly in a single layer in a microwave safe plate. Microwave it for 2 min on high.
Let stand for a couple of min, take it out of the microwave, give it a stir and put it back in the microwave for another one min.
Repeat the process until the peanuts are roasted. Usually it gets done in 4-5 min. It might still look raw when you take them out of the microwave. When it cools down, it will have the perfect crunch...
Make sure you don't burn them...
Not in a mood to do this, always go for store bought roasted ones :)

Heat a pan and coat it with ghee and add the sugar. Sugar will start melting and change into amber color.
The consistency of the sugar syrup is the key. And also mixing it with the nuts and spreading it fast.
Once the sugar starts changing color, immediately pour a drop of it into a bowl of cold water. If it crystallize, then its the right texture.
As soon as the color starts to change, take it off the stove, add a pinch of baking soda and immediately add the roasted nuts and mix well.
Pour this gooey mixture into a greased pan and flatten it use a rolling pin.
Or use the greased bottom of an another smaller pan, to press down the mixture.
Once cooled, break down into desired sized pieces.
Store in an airtight container.

P.S: It might take a couple of attempts to get the right consistency of the sugar syrup....so I would suggest always try with a smaller quantity first. But I promise you'll get there :)
Also you can use other nuts like cashews, almonds, pistachio etc along with the peanuts to make it a healthy energy bar :)


Total Pageviews

Powered by Blogger.