Wednesday, August 28, 2013

Baked Crispy Kale chips


Okay, let me be very frank...I have never bought  this veggie though I have seen it every time i go the produce section of the super market.
I have told you earlier too, my veggie choices were very limited :)
Of late, I have been seeing these kale chips all over the blogging world...wanna give it a try.
believe me, it tastes heavenly good.
ta dah, one more veggie in my so called "veggie choices".


We have the habit of having something crispy with our lunch. ie; with rice, dal and sabzi. Mostly we have paapad, at times when we don''t have paapad, we opt for plain old lays chips too..but we need something crispy..that is the rule :)
Now a days these kale chips have taken paapad's place.
They are baked, its a veggie, its crispy and above all its yummy.. C'mon, what more you can ask for?
Next time, when you go, get a fresh bunch of this beautiful veggie, and try these chips. you are gonna love it.

Recipe adapted from here


Baked Crispy Kale chips

Ingredients

  • Kale: I bunch (the curly kind)
  • Olive oil: 1 tbsp
  • Salt: 1 tsp

Instructions

  1. Preheat oven to 350 F.
  2. Line a cookie sheet with parchment paper.
  3. Wash the kale leaves thoroughly and dry it well on the kitchen towel. Use a salad spinner, if you have one.
  4. Remove leaves from the thick stem using a knife or kitchen shears and tear them into bite sized pieces.
  5. Drizzle kale leaves with olive oil and sprinkle with salt.
  6. Spread the leaves on the prepared cookie sheet, with the curly side down. Bake for 10-12 min until the kale leaves get crispy in the edges. For even baking, give the leaves a stir, half way through baking. Cool them completely before storing in an airtight container.
Next time you have those hunger pangs, munch on these yummy healthy snacks ;)


Saturday, August 24, 2013

Strawberry Banana popsicle


Who doesn't like popsicles? that too in this hot summer season.
My kids love them. Actually they prefer popsicles to ice cream :) Even I love them. Ice cream is a bit too sweet for me. I guess, my li'l ones have got my taste buds ;)
Its fun to see them run around with these popsicles in their hands...dripping it all over the house...well, cleaning up the mess isn't that fun, though :)
Mango smoothie is my li'l one's favorite flavor. I like the strawberry banana flavor, may be because of the tart.


This is an easy summer treat that pleases everyone...especially the kids and even the little kids in us too :)
Make it fancy, by alternately layering the strawberry and banana mixture.
Or, if in a hurry, blend everything together, still you have a delicious treat on hand.

Here is the recipe: Adapted from here

You'll need:

Strawberries: 1 lb (washed and hulled)
Lemon juice: 1 tbsp
Sugar: 3 tbsp
Banana: 2 nos (mashed)
Yogurt: 1/2 cup
Vanilla extract: 1 tsp


How to make:

Blend strawberries, 2 tbsp of sugar and lemon juice in a blender until smooth.
Pour half of the strawberry mixture into the molds, ie; filling about 1/3 of the molds. And put it in the freezer for a few min.
Meanwhile,in a bowl, mix mashed banana, yogurt and the vanilla extract until combined.
Pour the banana mixture into the molds, filling molds 2/3 full.
Pour the remaining strawberry mixture on the top.
Freeze at least 5-6 hrs or overnight, until completely frozen.
Once frozen, show the molds under warm running water to get the popsicles out easily.


Tuesday, August 20, 2013

Zucchini Bread


Four to five years back, i haven't even heard of this vegetable, zucchini.
One day, at work, one of my colleague brought this delicious cake and said its zucchini bread.
A yummy cake using a vegetable..I was all excited about the idea :)
I ate a piece and fell in love with it, though I had know idea what zucchini was or how it looked like.
Anyway, during my next trip to the grocery store,i went straight to the produce section looking for this mystery vegetable, and grabbed a couple of them.


Since then every summer, I make this delightful bread a number of times.
One of everybody's fav evening snack. (Can also be a breakfast too)
Easy to bake, calls for vegetable oil instead of butter, lots of veggie, all in all a win-win.
Even today, there are lots of veggies in the produce aisle I haven't given a try. I guess, I have to think outside the box (I mean, outside my limited staple vegetable choices)
I use zucchini in stir-fries too. It tastes so good.


Here is the recipe, adapted from allrecipes.com

You'll need:
Recipe makes 1 loaf

All purpose flour: 1 1/2 cups
Sugar: 1 cup
Eggs: 2 nos
Vegetable Oil: 1/2 cup
Baking soda: 1/2 tsp
Baking powder: 1/2 tsp
Zucchini: 1 cup (grated)
Salt: 1/2 tsp
Vanilla extract: 1 1/2 tsp
Ground cinnamon: 1 1/2 tsp
Chopped walnut: 1/2 cup


How to make:

Preheat oven to 325 degree F.
Grease and flour a 8 x 4 inch loaf pan.
Sift together flour, salt,cinnamon powder, baking powder and baking soda in a bowl.
In a large bowl, beat the eggs, add the sugar, oil and the vanilla extract.
Mix in the sifted ingredients to the creamed mixture and beat well.
Stir in the grated zucchini and chopped nuts and mix well until combined.
Transfer the batter into the prepared pan.
Bake for 40-50 min, or until the tester inserted in the center of the cake comes out clean.
Cool the pan on a rack for a few mins.
Enjoy the cake or the bread, what ever you call it...i guarantee,  its gonna taste good :)


Wednesday, August 7, 2013

Upside down plum cake


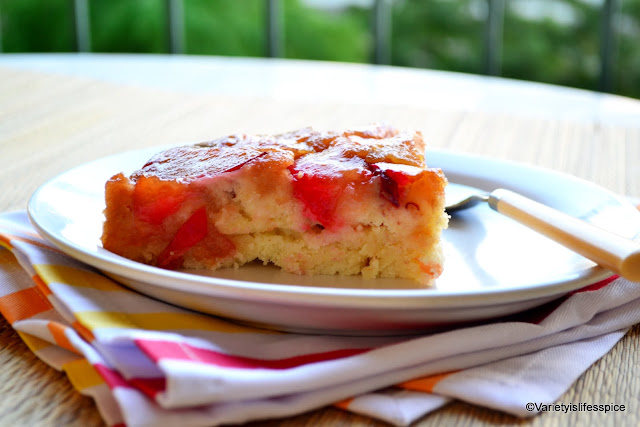
Don't you love to bake all these fancy cakes...I do...Its my first time baking an upside down cake. I have always wanted try the upside down pineapple cake.
But, its summer time and have lots of stone fruits handy...so tried this plum cake...look at that! isn't she a beauty :) an absolute treat for the eyes...also for your tummy too.
I did make some plum jam too...recipe coming soon...
Don't get carried away by the looks..This cake is pretty simple to make. The cake part is just easy as any ordinary pound cake.
And you can go all artistic in arranging the plum slices :)


This is what I like about summer....I get to do a lot with peaches, plums, mangoes, zucchini, water melon, avocados, corn, cherries and what not?
I guess some people are born to eat, and our family is definitely one of them :)
How about you? 

Here is the recipe

You'll need:

6 large plums,each pitted and cut into 8 wedges
All purpose flour: 1 1/2 cups
Butter, unsalted: 1 1/2 stick (12 tbsp), softened
Sugar: 3/4 cup
Brown sugar: 3/4 cup (for the topping)
Baking powder: 2 tsp
Vanilla extract: 1 tsp
Milk: 1/2 cup
Eggs: 2 nos
Ground cinnamon: 1/2 tsp
Salt: 1/4 tsp

How to make:

Preheat oven to 350 degree F.
In a small sauce pan melt 4 tbsp of butter. Once the butter melts and start turning brown in color, immediately add the brown sugar. Cook butter and sugar, stirring continuously, for 2-3 min.
Pour the mixture into a greased 9 inch cake pan, spreading all over the bottom of the pan using a spatula.
Arrange plum slices in overlapping concentric circles on top of the butter-sugar mixture.

Sift together the flour, baking powder, salt and cinnamon powder.

In  large bowl, beat the remaining 8 tbsp of butter and sugar together using an electric mixer.
Add eggs, one by one, beating constantly. Add in the vanilla extract.
Add the dry ingredients, alternately with milk and continue beating until light and fluffy.
Spread cake batter on top of the plum. Bake for 40-45 min until an inserted tooth pick comes out clean.
Let cool for a few min, and flip over the cake on to a plate.
tah- dah!!! Enjoy your slice with vanilla ice cream on top :)


Monday, August 5, 2013

Mint chutney / Pudina chutney with coconut recipe


I love backyard gardens. I always wanted to have a backyard garden ever since I got married. Not that I have one now, but these days we live in the ground floor, and I have a little space around our patio, which i try to turn into a small vegetable garden.
I have got this from my mom.Have you ever wondered how most of our habits, likes, dislikes, we get from our parents.I guess, that is what these genes do, huh?
My mom always keeps here backyard garden active with the seasonal plants. And I have seen her proudly sharing her farm fresh produce with her neighbors :)


Surprisingly this spring, I started seeing a few mint plants in my so called garden, which gradually took over the entire space. I said surprisingly, because I didn't plant them. I assume the previous tenant would have had some, but this is the first time I am seeing mint leaves spreading like weeds.
Anybody passing by smells these wonderful herb, and asks me, is that mint (read, can I have some of those mint leaves)
Even I share much of it with my neighbors, because i use mint only for biriyani and bombay sandwich chutney. (now you see the genes thing I said above, right ;)
I usually make coriander chutney for dosa and idli. But have tasted the mint chutney in some authentic Tamil restaurants.I love the tang of this chutney.
Now that I had some much of mint leaves on hand, I made this chutney for a change. I liked it.

Here is the recipe.

You'll need:

Mint leaves: 3/4 cup (loosely packed)
Grated coconut: 3/4 cup
Roasted gram daal (Pottukadalai) : 2 tbsp
Ginger: a small piece
Tamarind: a small piece
Green chilli: 3-4 nos
Salt: as per taste 

How to make:

Wash and drain the mint leaves.
Heat a pan on medium-low flame and saute the mint leaves, until it shrinks in volume.
Grind together the mint leaves, grated coconut, gram dal, green chillis, ginger, tamarind and enough salt.
Add a few tbsps of water, just enough to blend all the ingredients together.
Serve with dosa or idli.
Enjoy!

P.S: If diluted, the chutney can be used as a dip for samosa, pakoda and all.

Thursday, August 1, 2013

Granola bar


Are you a morning person? I am not. I can stay up late in the night, but getting up early is a no no for me.
If you are like me these granola bars are your life saver. I love having it as a snack, but these energy bars can be perfect grab n go breakfast too...
I have to eat when I am hungry. I mean, I am a hangry person. Hunger pangs makes me angry.
These granola bars have saved me in those situations. Especially on those days when you have a bit of long drive back home after work, or you had a light breakfast and its not lunch time yet.
Even otherwise I like to munch on this crispy bars of delight.

I used to buy them from the grocery stores, until one day I found these yummy granola in a near by farmers market. I bought some and thought, why not try to make some granola bars of it...brilliant idea, huh?

It's not that a big deal to whip these up, if you have the ingredients handy.

Here is the recipe : Adapted from Ina Garten's recipe here

You will need:

Old fashioned oatmeal: 2 cups *
Toasted wheat germ; 1/2 cup
Unsalted butter: 3 tbsp
Light brown sugar: 1/4 cup
Honey: 2/3 cup
Vanilla extract: 1 1/2 tsp
Salt: 1/4 tsp
Almond: 1 cup (sliced)
Dried apricots: 1/2 cup (chopped)
Dried cranberries: 1/2 cup
Raisins: 1/2 cup

* I substituted 1/2 cup of oatmeal with store bought granola.Not necessary.You can follow the original recipe. Also you can mix and match different nuts and dried fruits of your choice.

How to make:

Preheat oven to 350 degree F.
Grease a 9 x 13 inch baking pan and line it with parchment paper.
Toss the oatmeal, almonds together on a sheet pan and bake 10-12 min, stirring occasionally, until lightly browned.
Transfer the mixture to a large mixing bowl and stir in the wheat germ.
Reduce oven temperature to 300 degree F.
Place butter, honey, brown sugar, vanilla extract and salt in a small saucepan and bring to a boil over medium heat. Cook for a couple of min and pour over the toasted oatmeal mixture. Add the dried fruits and stir well.
Pour the mixture into the prepared pan and press it down using a spatula or by hand.
Bake for 25-30 min, until golden brown. Cool for 2-3 hrs and cut into desired shapes.
Store in an airtight container.
Make sure you have a couple of these in your hand bag before you step out :)


Wednesday, July 24, 2013

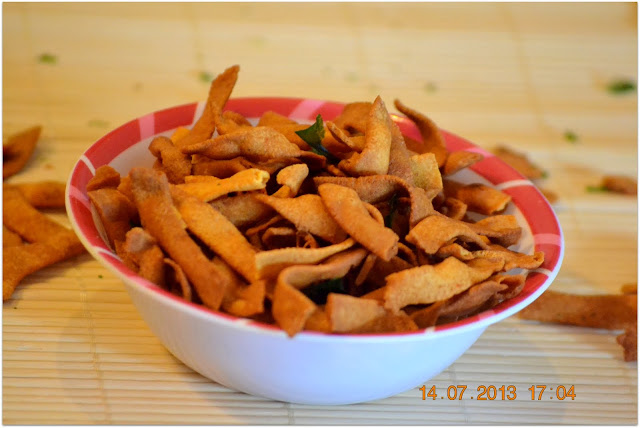
Pakkavada/Ribbon pakoda (A savory Kerala snack)


There are a few staple snacks my mom, my grand mom used to make when we were kids.They make them in bulk occasionally and its stored in airtight tin boxes. Me being a savory persons always loved them.
My mom used to make spicy mixture (my cornflake mixture is an easy version of it), pakkavada, kaya varuthathu (raw plantain chips), chakka varuthathu (raw jackfruit chips), masala peanuts, Murukku.....the list goes on and on.
The ones you get in the stores, i mean the bakery shops, small chips shops near bus stand n railway station in Kerala are equally good. They make it in pure coconut oil....yummm ...divine :)
I always make my dad buy a couple of bags of these whenever I travel by bus or train for studies/work.
Life was pretty easy then. Anyway gone are those days...

Recently, while browsing through my mom's recipe collection (of which we all 3 sis have made a copy of), i came across the pakkavada recipe.
Seemed simple, just a few ingredients. And also i had the gadget, the idiyappam press/mold (I got mine from my MIL,she got it from her MIL).

This is how it looks


Here is a link to the modern version of it.
http://www.perfectpeninsula.com/KitchenPress.html
I have seen this in a few Indian stores around. But the old ones are really sturdy and durable.

Here is the recipe.

You'll need:

Besan / Gram flour (Chickpea flour) : 2 1/2 cups
Rice flour : 1 cup
Asafoetida : 1/2 tsp
Red chilli powder :  1 1/2 tsp
Melted butter: 1 1/2 tbsp
Warm water : enough to make the dough (approx 1 1/2 cups)
Salt : to taste
Curry leaves : a few sprigs (for garnish)

How to make:

In a mixing bowl, combine besan, rice flour, chilli powder, asafoetida, salt and melted butter.
Add warm water little by little and knead it into a smooth dough. It might be a little sticky, apply a little bit of oil on to your palms to keep the dough from sticking. But the consistency must be looser than the regular roti dough.
Put the narrow slit disc in the press and fill it with the dough by hand or by a spoon.

Heat oil in a deep frying pan. When it gets sizzling hot, pipe the dough into the oil slowly and carefully in a circular motion. Fry until it gets golden brown in color, and drain them on to a paper towel.
Do it in batches. Once done, turn off the heat and immediately add a few springs of curry leaves to the oil.
Be careful, it will splutter !!
Fry just for a few secs, drain and mix with the pakkavada.
Enjoy the anytime yummy snack :)

Thursday, July 4, 2013

Blueberry Muffin


I like muffins...they are cute :)  its easy to make, and its yummy.

Though muffins are considered a complete healthy meal elsewhere, in my house its always treated as a snack..Say, I make some sweet or savory muffin in the morning, everyone( read husband) eats a couple of them  and then after a while, here comes the question "what is for breakfast"..... are u kidding me?
but still I make them quite often as some evening snack...


I always love the jumbo blueberry muffin you get in the coffee shops... the juicy baked fruit that oozes out when you split open one, its divine :)
Take it from me, this is one easy on the go breakfast for all you busy bees out there. Make them ahead of time, and they do stay fresh for a day or two.


You'll need:

All purpose flour : 2 cups
Sugar: 1 cup
Butter: 1/2 cup (softened)
Baking Powder: 2 tsps
Egg: 2 nos
Milk: 1/2 cup
Salt: 1/4 tsp
Vanilla Extract: 1 tsp
Blueberries: 1 cup (fresh or frozen)

How to make:

Preheat oven to 375 F. Line or grease a 12 cup muffin pan.
In a bowl, sift together the flour, baking powder and salt until well combined.
In an another bowl, cream softened butter and sugar using a mixer. Add eggs one at a time. Mix in milk and vanilla extract.Add the dry ingredients mixture into this, and beat it just until moistened. Fold in the blueberries. Fill in the prepared muffin cups 2/3 full.
Bake in the preheated oven for 20-25 min or until a tooth pick inserted into the center comes out clean.
Cool on a wire rack before serving.

Notes:
These muffins are good as such without any toppings. If particular about topping, mix 2 tsps of sugar and 1/2 tsp of ground nutmeg and sprinkle it over, after filling up the muffin tins.


Sunday, June 30, 2013

Peanut Chikki/ Peanut Brittle (Kadalai Mittai)


I like to call it kadalai mittai...no, kappalandi mittai to be very precise....thats what we call it in our place :)
an all time fav of all desis (Indians)....we always had a bag of this in our snack shelf..
I have not seen my mom make this at home...dont know why, may be because we used to get it in every other grocery store in my hometown, even in the tiny petti kadas (small convenient stores near the houses)


After coming to the US, we always had to depend on the Indian grocery store to get some chikki...but sadly, most of the time we had to compromise with stale or kind of cold, not crisp, not so fresh chikki....
and that made me look for the recipe for chikki in the web....and surprisingly got to know its not that very difficult to make some home....but let me warn you first, you have to try it a couple of times to master the right consistency and the timing factor...i have had my share of flop attempts too :)
but once you get the grip on it,  its a piece of cake.


You can either use roasted unsalted peanuts or get raw peanuts and roast them in the microwave.
I always buy raw peanuts in bulk and roast them in microwave.It hardly takes 4-5 mins...

Here is the recipe

You'll need:

Peanuts: 1 cup (roasted & unsalted or raw peanuts roasted in microwave)
Sugar: 3/4 cup
Ghee: 1/4 tbsp
Baking Soda: a pinch

How to make:

Spread the raw peanuts evenly in a single layer in a microwave safe plate. Microwave it for 2 min on high.
Let stand for a couple of min, take it out of the microwave, give it a stir and put it back in the microwave for another one min.
Repeat the process until the peanuts are roasted. Usually it gets done in 4-5 min. It might still look raw when you take them out of the microwave. When it cools down, it will have the perfect crunch...
Make sure you don't burn them...
Not in a mood to do this, always go for store bought roasted ones :)

Heat a pan and coat it with ghee and add the sugar. Sugar will start melting and change into amber color.
The consistency of the sugar syrup is the key. And also mixing it with the nuts and spreading it fast.
Once the sugar starts changing color, immediately pour a drop of it into a bowl of cold water. If it crystallize, then its the right texture.
As soon as the color starts to change, take it off the stove, add a pinch of baking soda and immediately add the roasted nuts and mix well.
Pour this gooey mixture into a greased pan and flatten it use a rolling pin.
Or use the greased bottom of an another smaller pan, to press down the mixture.
Once cooled, break down into desired sized pieces.
Store in an airtight container.

P.S: It might take a couple of attempts to get the right consistency of the sugar syrup....so I would suggest always try with a smaller quantity first. But I promise you'll get there :)
Also you can use other nuts like cashews, almonds, pistachio etc along with the peanuts to make it a healthy energy bar :)


Total Pageviews

Powered by Blogger.