Friday, February 24, 2012
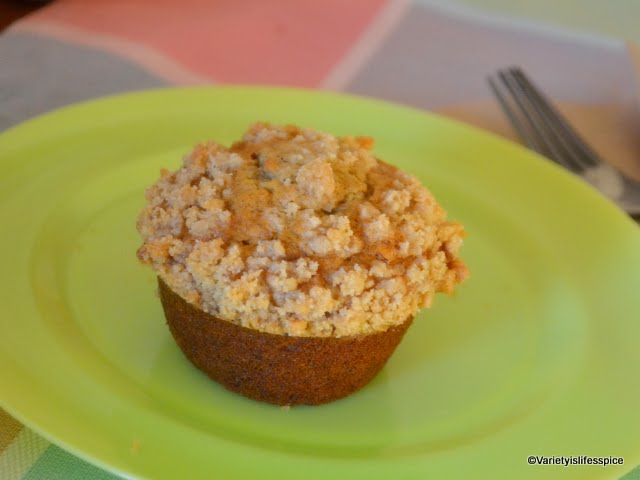
Banana nut muffin...with a crunchy topping
what do you do with those over ripened bananas? I'm always out of options when i think of getting rid of the over ripened bananas...i like my banana just ripe....no more ..no less...even my li'l one enjoys hers the same way...usually we buy only a few at time, so that we don't have to worry about the over ripened ones...
was looking for ideas to use them, and happened to see this muffin recipe...which actually called for these over ripened bananas...bingo...there you go :)
and the crunchy topping.....an added bliss to the muffins...i have had these crunchy toppings in the store bought ones n have always wondered what they are...and here it is...a crowd pleaser...
You'll need:
For the muffin:
All purpose flour: 1 1/2 cups
Baking Soda: 1 1/2 tsps
Salt: 1/4 tsp
Nutmeg powder: 1/8 tsp
Over ripened bananas: 4 nos
Chopped and roasted walnut or pecan: 1 cup
White sugar: 1/2 cup
Egg: 1 large
Vanilla extract: 1/2 tsp
Butter: 1/2 cup (1 stick, softened)
Milk: 1/4 cup
For the topping:
All purpose flour: 2 tbsp
Cinnamon powder: 1/8 tsp
Butter: 1 tbsp
Brown sugar: 1/3 cup
How to make:
Preheat oven to 375 degrees.
Line a standard 12 cup muffin tin with paper muffin cups or grease with butter.
In a medium bowl, sift together flour, baking soda, salt and nutmeg powder.
In a small bowl, mash two bananas with a fork, so that they still have a texture.Set it aside.
In another bowl, mash the remaining two bananas along with the sugar using an electric mixer.
Add butter, milk, egg and vanilla extract and beat it together until its completely incorporated, scraping down the sides using a spatula as and when needed.
Add the dry ingredients mixture to this in batches and mix just until its well incorporated.
Fold in the chopped nuts and the reserved mashed bananas to this.
For the topping, in a small bowl, mix the flour, cinnamon powder and sugar. Cut in the butter to this mixture, until it resembles coarse corn meal.
Pour the batter into the prepared muffin cups using an ice cream scoop. Sprinkle the top of muffins with the prepared topping.
Bake in the middle rack of the oven for about 18-20 min ,until the muffins turn golden brown or when the tester inserted into the center of the muffin comes out clean.
Let the muffin tray cool on the wire rack for a few minutes, before you indulge yourself in those delicious yummy muffins...
Serve it hot...the best way to enjoy them, enjoy a few crunchy crumbs on the top first....and then dive into the muffin...yummm
Labels:
Baking,
banana,
banana nut muffin,
Breakfast,
easy muffin recipe,
Muffin,
Snack
Wednesday, January 11, 2012
Fluffy Flaky breakfast biscuits...
Warm fresh biscuits for breakfast, I love them..I guess I started liking it after having the breakfast sandwiches we get on warm biscuits in Dunkin Donuts...yummm
Okay, to be candid, I was not sure i could bake biscuits at home...its like the sugar glazed donuts from Dunkin Donuts...I don't think I will be ever able to make such soft and spongy ones at home...wait a min...you never know.....i might some day...oh!! how optimistic (not at all like me :)Okay, go ahead and give this a try....I am sure you will be happy with the results...We started our new year with these fluffy home made biscuits for breakfast...
You'll need:
All purpose flour: 2 1/2 cups
Baking powder: 2 tsp
Baking Soda: 1/4 tsp
Salt: 1 1/2 tsp
Sugar: 1 tbsp
Butter: 1/2 cup (chilled)
Buttermilk: 1 cup (chilled)
How to make:
Preheat oven to 425 degrees.
In a large bowl, sift together all the dry ingredients, ie; all purpose flour, baking powder, baking soda, salt and the sugar.
Cut in the cold butter with a fork into the dry ingredients and mix it together...(there will be small chunks of butter, which is totally okay)
Pour the buttermilk and mix using a wooden spoon until the dough starts to come together.
Now knead using your hands for a couple of times. The dough should be sticky.
Turn the dough on to a floured surface and knead it just until it dough comes together.
Roll the dough using a rolling pin to 1/2 inch thickness. Cut out rounds using a biscuit cutter and place them on the baking sheet. (At this point you can brush the top of each with some melted butter...it gives the golden crust on top)
Bake in the preheated oven for about 12 min, or until it gets the golden crust on top.
Serve hot out of the oven....a perfect breakfast as such... good for sandwiches too...
sausage egg n cheese on a buiscuit, anybody....I am in :)
You'll have a good one :)
Sunday, January 1, 2012
Date-Nut Bread... Welcome 2012!!
A very prosperous new year, 2012 to all of you :)
Winter has set in...that marks the beginning of baking time in our place...may be because I have more time in hand this time of the year, bcoz its cold outside and we tend to stay indoors with our li'l one :)
I don't know, may be another excuse to bake..I love to bake....not that all my attempts has always been a success...but still I love to bake...
hope you'll had wonderful new year's day celebrations....ours was a low key affair this time....watching ball drop slouched on the sofa, wishing everyone a happy new year, afternoon mass and a lunch buffet....
This date nut bread is something I baked for the first time...I had bookmarked it here
http://kateinthekitchen.com/2008/12/22/national-date-nut-bread-day/
A good bread to munch on as an evening snack...
Here is the recipe
You'll need:
All-purpose flour: 1 1/2 cups
chopped dates: 2 1/2 cups
Butter: 1/4 cup
Boiling water: 1 1/2 cups
Brown sugar: 1/2 cup
Egg: 1 no
Baking powder: 1 tsp
Baking soda: 1 tsp
Salt: 1/2 tsp
Chopped almonds: 1 cup
How to make it:
Preheat oven to 350 degree F. Grease a 9 by 5 inch loaf pan.
Combine the flour, baking powder, baking soda and salt and set aside.
In a bowl, mix butter and dates. Pour boiling water into this and break up the clumps, if any. Let this cool down for a while.
Mix in the sugar and egg until well blended.
Add the flour mixture into the date mixture, and mix well.
Pour the batter into the greased pan and bake for 50 min or until a wooden pick inserted comes out clean :)
Winter has set in...that marks the beginning of baking time in our place...may be because I have more time in hand this time of the year, bcoz its cold outside and we tend to stay indoors with our li'l one :)
I don't know, may be another excuse to bake..I love to bake....not that all my attempts has always been a success...but still I love to bake...
hope you'll had wonderful new year's day celebrations....ours was a low key affair this time....watching ball drop slouched on the sofa, wishing everyone a happy new year, afternoon mass and a lunch buffet....
This date nut bread is something I baked for the first time...I had bookmarked it here
http://kateinthekitchen.com/2008/12/22/national-date-nut-bread-day/
A good bread to munch on as an evening snack...
Here is the recipe
You'll need:
All-purpose flour: 1 1/2 cups
chopped dates: 2 1/2 cups
Butter: 1/4 cup
Boiling water: 1 1/2 cups
Brown sugar: 1/2 cup
Egg: 1 no
Baking powder: 1 tsp
Baking soda: 1 tsp
Salt: 1/2 tsp
Chopped almonds: 1 cup
How to make it:
Preheat oven to 350 degree F. Grease a 9 by 5 inch loaf pan.
Combine the flour, baking powder, baking soda and salt and set aside.
In a bowl, mix butter and dates. Pour boiling water into this and break up the clumps, if any. Let this cool down for a while.
Mix in the sugar and egg until well blended.
Add the flour mixture into the date mixture, and mix well.
Pour the batter into the greased pan and bake for 50 min or until a wooden pick inserted comes out clean :)
Tuesday, December 27, 2011
Marble cake.. perfect for holiday season
Hope you'll had a wonderful Christmas :) holiday cheer is still in the air...people visiting their near n dear ones..cooking together, enjoying meals together, shopping together and what not!! enjoy your holidays.....
an easy breezy cake to enjoy with your evening cup of tea when you catch up with your kith n kin....
You'll need:
All purpose flour: 2 cups
Butter: 1/2 cup (1 stick) softened
Sugar: 1 cup
Baking powder: 2 tsp
Salt: 1/2 tsp
Eggs: 2
Milk: 1 cup
Vanilla extract: 1 tsp
Cocoa powder: 2 tbsp
How to make it:
Preheat oven to 350 degrees. Grease a 9 by 5 pan and set aside.
Swift together all purpose flour, baking powder and salt.
In a bowl, beat butter and sugar until light and fluffy.
Add eggs one at a time, beating well until everything is well mixed together.
Mix in vanilla essence.
Add the flour mixture in batches, alternating with the milk.
Set aside 1/3 of the batter. Pour the remaining batter into the cake pan.
Mix cocoa powder into the reserved batter, until well blended.
Pour spoonfuls of the cocoa batter over the white batter. Using a knife, swirl the cocoa batter into the white batter to give the marble effect.
Bake for 30 to 35 min, until an inserted wooden pick comes out clean.
Transfer pan to a rack and let it cool for 10 min.
Enjoy your piece of cake. This is how i get mine in my fav coffee shop :)
an easy breezy cake to enjoy with your evening cup of tea when you catch up with your kith n kin....
You'll need:
All purpose flour: 2 cups
Butter: 1/2 cup (1 stick) softened
Sugar: 1 cup
Baking powder: 2 tsp
Salt: 1/2 tsp
Eggs: 2
Milk: 1 cup
Vanilla extract: 1 tsp
Cocoa powder: 2 tbsp
How to make it:
Preheat oven to 350 degrees. Grease a 9 by 5 pan and set aside.
Swift together all purpose flour, baking powder and salt.
In a bowl, beat butter and sugar until light and fluffy.
Add eggs one at a time, beating well until everything is well mixed together.
Mix in vanilla essence.
Add the flour mixture in batches, alternating with the milk.
Set aside 1/3 of the batter. Pour the remaining batter into the cake pan.
Mix cocoa powder into the reserved batter, until well blended.
Pour spoonfuls of the cocoa batter over the white batter. Using a knife, swirl the cocoa batter into the white batter to give the marble effect.
Bake for 30 to 35 min, until an inserted wooden pick comes out clean.
Transfer pan to a rack and let it cool for 10 min.
Enjoy your piece of cake. This is how i get mine in my fav coffee shop :)
Friday, December 23, 2011
Thattai- a savory snack
I love salty spicy snacks...I can munch on them endlessly...my mom always scolds me for eating chips right off the packet....but that is the fun part..not eating by portion :)
sounds lame?? i know..i still do that....even these days when I go home even before having my morning cup of coffee, I attack the chips canisters which will be definitely there in my mom's kitchen shelves....mostly with jack fruit chips or some other seasonal chips....of course home made :)
coming back to this savory snack, Thattai, I have eaten this many times, but have never made them at home...
thanks to our neighbor who gave us some this diwali along with some yummy sweets :)
had bookmarked the recipe since then, but only got a chance to make them recently...
effort wise, I would say it is a bit tedious, bcoz each n every single piece has to shaped separately...a little bit more time consuming than the usual snacks, but can definitely be made once in a while..
Here's the recipe:
You'll need:
Rice flour: 2 cups
Urad dal flour: 1/4 cup **
Red chili pwdr: 1 tsp
Salt: 1 tsp
Ghee: 1 tbsp
Water: 1/2 + 1/8 cup (or enough to make the dough)
Chana dal: 3 tbsp (soaked in water for 1 hr)
Sesame seed: 2 tsp
Asafetida: 1/4 tsp
** To make urad dal flour at home, dry roast ural dal till it turns golden brown. Let it cool and grind into a fine powder.
How to make:
Drain the soaked chana dal.
Mix rice flour, urad dal flour, salt, chana dal, sesame seed, chili pwdr and butter. Knead this into a dough by adding water little by little at a time. Cover and set aside for a few min.
After a while, take small balls of dough (half a lemon sized) and press them into small paapad size.
Place the dough on a cling film and press by hand to form small flat circles. Poke these using a fork to prevent from puffing while frying in the oil.
Heat enough oil in a pan for deep frying. When the oil becomes piping hot add the thattai one at a time, frying each side for about 1 1/2 min , until they turn golden brown. Drain and let it cool.
Store in an air tight container.
Wednesday, December 7, 2011
How to fold a fitted sheet!!
hey, this post might sound silly to most of you...but a few like me would be happy to know how to fold a fitted sheet...
this happens every time I do the laundry, i struggle to fold the fitted sheet neatly and next time I take it out I get a completely creased sheet....
are you with me on this one....see the easy steps to fold one...
Martha Stewart is there to help....
http://www.marthastewart.com/269141/how-to-fold-a-fitted-sheet
a piece of cake, rite?
you'll have a good one :)
Friday, December 2, 2011
My li'l one turned one!!
A few weeks ago, my li'l one turned one :) One whole year of motherhood days for me(mostly happy moments and occasional low ones too)....we threw a small party for a few friends of ours...so was busy putting together some party decorations, somethings with a personal touch, like a birthday banner with every month's photos of my li'l one's first year...and few other silly stuffs to make the party hall look colorful...
i guess I get this from my mother...to add a personal touch to anything and everything you do...and my dear hubby,the last man in the world to appreciate it.....okay, so you get where I am going with this, rite?
Anyway, the birthday party was great...we had fun...even my li'l one enjoyed it to the fullest ,except for the occasional screams when a balloons burst...she can't stand sudden loud noises...like a whistle from the cooker, or the vacuum cleaner or even the hair dryer....strange, huh?
okay, coming back to the cake, i guess that was the highlight of the party...we had been to a few b'day parties before, even one last weekend, and have always enjoyed a slice of the yummy b'day cake....and the hunt began for the cake...went to the bakeries in the usual places where we had seen the b'day cakes..but all had the regular white or chocolate cake with the theme you say...(for our li'l one we wanted a sesame street cake)...but we were pretty sure the b'day cakes we had eaten before were not mere white or choc cakes...they were much tastier than those...anyways, long story short, a few days before the party a friend of us (who had thrown a b'day recently) suggested to get the tres leches cake.....bhoom...what in the world is that? oh, my!! but luckily he also said where to find it....okay, that helps :)
I consoled myself feeling, I am not the only one in the whole wide world who didn't know about Tres Leches cake..even the pioneer woman didn't have a much idea about it ..
here is more about it from the very talented pioneer woman
http://thepioneerwoman.com/cooking/2009/09/tres-leches-cake/
So, now you ask me why such poor pictures, even though we have a Nikon D-SLR with some XYZ lenses and all....aaaha...don't make go there...plz don't...
you'll have a good one :)
i guess I get this from my mother...to add a personal touch to anything and everything you do...and my dear hubby,the last man in the world to appreciate it.....okay, so you get where I am going with this, rite?
Anyway, the birthday party was great...we had fun...even my li'l one enjoyed it to the fullest ,except for the occasional screams when a balloons burst...she can't stand sudden loud noises...like a whistle from the cooker, or the vacuum cleaner or even the hair dryer....strange, huh?
okay, coming back to the cake, i guess that was the highlight of the party...we had been to a few b'day parties before, even one last weekend, and have always enjoyed a slice of the yummy b'day cake....and the hunt began for the cake...went to the bakeries in the usual places where we had seen the b'day cakes..but all had the regular white or chocolate cake with the theme you say...(for our li'l one we wanted a sesame street cake)...but we were pretty sure the b'day cakes we had eaten before were not mere white or choc cakes...they were much tastier than those...anyways, long story short, a few days before the party a friend of us (who had thrown a b'day recently) suggested to get the tres leches cake.....bhoom...what in the world is that? oh, my!! but luckily he also said where to find it....okay, that helps :)
I consoled myself feeling, I am not the only one in the whole wide world who didn't know about Tres Leches cake..even the pioneer woman didn't have a much idea about it ..
here is more about it from the very talented pioneer woman
http://thepioneerwoman.com/cooking/2009/09/tres-leches-cake/
So, now you ask me why such poor pictures, even though we have a Nikon D-SLR with some XYZ lenses and all....aaaha...don't make go there...plz don't...
you'll have a good one :)
Subscribe to:
Posts (Atom)
Total Pageviews
Powered by Blogger.